
I have finally decided to learn all this stuff about Test Driven Design (TDD). I have a few projects that I go back to every now and then and it would be nice to be able to start hacking away without needing to remember every bit of the project. After looking around and investigating several other Continuous Integration systems I have ended up on Jenkins withShiningPanda plugin. The development team where I work uses Jenkins and it is reasonably easy to set up but I was initially against it because the machine I have to run it on is fairly low spec. It turns out it isn’t too much of a resource hog for a JVM based application (only 20% of my memory and 10% constant cpu usage).
Installing Jenkins was easy as they provide rpms for Fedora and its derivatives at http://pkg.jenkins-ci.org/redhat/ with instructions for setting up yum repos.
Installing ShiningPanda was also simple. Go to the Manage Plugins section under the Manage Jenkins menu item on the left of the Jenkins interface and search for ShiningPanda in the Available tab. Select the checkbox beside the plugin and press the Download now and install after restart.
The next step was installing multiple python binaries so that I can test that my applications will run on the commonly deployed versions. While looking around to try and work this out I discovered pythonbrew and then a nice description on how to use it with ShiningPanda at http://ampledata.org/python_version_testing_with_jenkins.html which helped me greatly and which I based most of this around. I needed to make a few tweaks to the script because running Jenkins as a daemon was changing it’s current working directory to “/” which was making it fail.
Once Jenkins has restarted after the installation of ShiningPanda go back into the Manage Jenkins area and select the Script Console item. This script console allows you to run arbitrary scripts on the Jenkins box. We can use this to install pythonbrew with the following script. This script works on a RPM install of Jenkins which is installed under /var/lib/jenkins. You may need to adjust the paths in the calls to .execute() to suit your system.
def download = """curl -skLO https://raw.github.com/utahta/pythonbrew/master/pythonbrew-install"""
def download_proc = download.execute(null, new File("/var/lib/jenkins"))
def install = """bash pythonbrew-install"""
def install_proc = install.execute(null, new File("/var/lib/jenkins"))

download_proc.waitFor()

println "return code: ${download_proc.exitValue()}"
println "stderr: ${download_proc.err.text}"
println "stdout: ${download_proc.in.text}"

install_proc.waitFor()

println "return code: ${install_proc.exitValue()}"
println "stderr: ${install_proc.err.text}"
println "stdout: ${install_proc.in.text}"
I unfortunately didn’t collect the output of the above script but it has a reasonable amount of output which explains what it did. If it doesn’t work then it just prints the output codes of the commands in the stderr parts and something has gone wrong.
Before we continue to setup pythonbrew in Jenkins we need to check that we have the dependencies for building our different versions of python and install if necessary. There may be more than the following but these were the ones I needed.
rpm -q bzip2-devel gdbm-devel ncurses-devel openssl-devel readline-devel sqlite-devel zlib-devel
You can check later in /var/lib/jenkins/.pythonbrew/log/build.log once you have attempted to build your first python to see if there are any issues. Look for the bit like this:
Python build finished, but the necessary bits to build these modules were not found:
_bsddb             _tkinter           bsddb185
dl                 imageop            sunaudiodev
Apparently “dl” is for i386, “sunaudiodev” is for Solaris systems, “imageop” and “bsddb” are obsolete and I don’t need “tkinter” so I am not worried about that result.
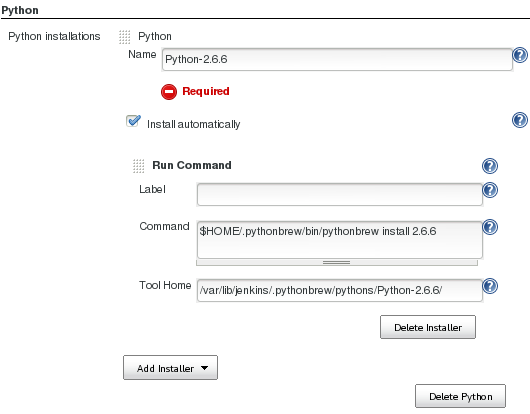
Now that we have pythonbrew installed we need to setup the ShiningPanda plugin to use it to automatically build the versions of python that we want to test against. This is done via the Jenkins web interface. Go to Manage Jenkins -> Configure System and scroll down to the Python Installations section. I deleted the system python that was already there and Then selected Add Python. Put a name for your python installation in the Name section, it needs to have no spaces in it such as “Python-2.6.6” and then select the checkbox beside Install automatically. For the Command put “$HOME/.pythonbrew/bin/pythonbrew install 2.6.6” and then for Tool Home put in “/var/lib/jenkins/.pythonbrew/pythons/Python-2.6.6/”. For some reason using “$HOME” didnt work in the Tool Home section for me but it worked if I put the full path. Add as many versions of python as you would like by repeating the steps and changing the version number to suit. Save using the Save button at the bottom of the page.
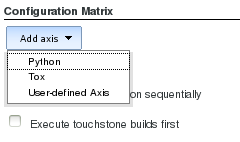
The next step is to setup a New Job using the menu item at the top left from the main page. Add a Name for your job and the selectBuild multi-configuration project and hit OK. I use Bitbucket.org for hosting my repositories so I added a Git repository in the Source Code Management section the in Build Triggers chose Poll SCM . There is a help button on the right hand side explaining the format to create a schedule. Now we are to the bit where we configure our python. In the Configuration matrix section select Add Axis and choose Python from the drop down. Now you can select your choice of python installs from the ones you setup earlier. **
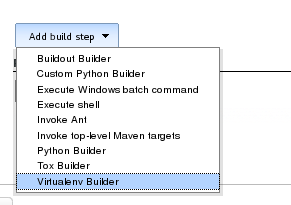
The Build section is where you can add the commands you would like to run to build and test you project. I run mine in a Virtualenv which is an awesome tool created by Ian Bicking which creates a isolated python environment for your work. From the Add build step drop down select Virtualenv Builder and then add your command.
For a simple Django project the commands can be:
pip install Django
$PYTHON_EXE manage.py test

Now save it and you are complete. You should now be able to go back to the top of the page and select Build Now from the menu at the top left. The first time it runs it will take a while as it needs to build your pythonbrew instances of python but after that it should be much quicker.